Cyber Drone: Getting Started

This guide describes the basic steps to get started with Cyber Drone

The asset has been tested with Unity Engine 5.6.0 and 2017.1 Versions.

What This Package Includes

  • Cyber Drone model PBR and Mobile (LOD0, LOD1, Collision mesh)
  • Cyber Drone controller scripts for engines, eyes, and spine
  • Cyber Drone sources for 3ds Max and Substance Painter
  • Background scene with shattered planetoid and radiance effects
  • Sample asteroid meshes
  • Nebula cloud effect
  • Rift effect

Recommended setup

Before you can start with the example scenes it is advised to perform fine tuning of the editor according to the suggested checklist:

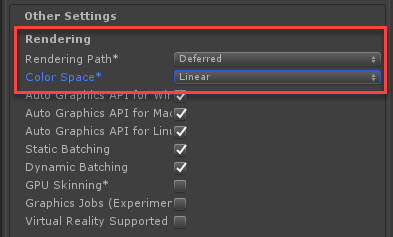
  • Enable Linear Color mode and set Rendering Path to Deferred

Enabling linear rendering in Unity is simple: It is implemented on a per-project basis and is exposed in the Player Settings which can be located at Edit -> Project Settings -> Player -> Other Settings

Read more: Linear Pipeline in Unity Manual

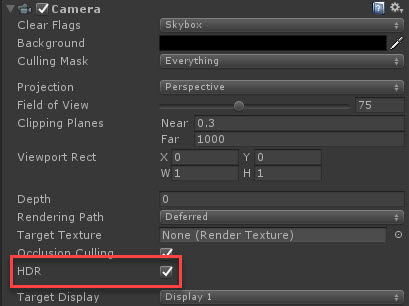
  • Enable HDR on your camera

HDR is enabled separately for each camera using a setting on the Camera component. More convincing visual effects can be achieved if the rendering is adapted to let the ranges of pixel values more accurately reflect the light levels that would be present in a real scene.

Read more: High Dynamic Range Rendering

  • Post Processing Stack [RECOMMENDED]

The new Unity post-processing stack is an über effect that combines a complete set of image effects into a single post-process pipeline: https://assetstore.unity.com/packages/essentials/post-processing-stack-83912

– Effects are always configured in the correct order.
– It allows a combination of many effects into a single pass.
– It features an asset-based configuration system for easy preset management.
– All effects are grouped together in the UI for a better user experience

It comes with the following effects :

– Antialiasing (FXAA, Temporal AA)
– Ambient Occlusion
– Screen Space Reflections
– Fog
– Depth of Field
– Motion Blur
– Eye Adaptation
– Bloom
– Color Grading
– User Lut
– Chromatic Aberration
– Grain
– Vignette
– Dithering

The stack also includes a collection of monitors and debug views to help you set up your effects correctly and debug problems in the output.

  • Legacy Cinematic Image Effects

The package can be downloaded from the Asset Store: http://u3d.as/mHd

Read more: Cinematic Image Effects

Known Issues

Please check the list of known issues and solutions in the Known Issues thread. Not all problems are necessarily posted there, but we do our best to post updates promptly.

Found a bug?

Please submit a case in the Bug Report thread. We will be there to squash the bug away!

Want to share your thoughts?

We sincerely appreciate your time to provide us with comments, feedback, and suggestions. There are always things that we could do better. Please share your ideas in the Feedback and Suggestions thread.

Have a question or need help?

If you have an urgent problem that is not documented here, please reach us out directly via the Contact Form. For non-urgent questions get in touch in the Technical Support thread and we will get back to your as soon as we can!

Help Guide Powered by Documentor
Suggest Edit